Outdoor safety topic scrambling safely
Source:- summarized by Bob St.John.
“Scrambling”, when used in conjunction with hiking, usually refers to off trail travel over exceedingly rough ground such as boulder fields, or non-technical climbing where the use of hands is required.
Clothing and Equipment
-
Protective Clothing
Minor falls and scrapes are to be expected while scrambling. Wear long pants and shirts or tops with long sleeves. Scramble objectives are often ridge tops or mountain summits where weather can change quickly; therefore bring protective outer layers (wind and/or rain shells), and warm insulating layers (sweaters, gloves, hats or toques). A pair of old gloves can protect hands while negotiating rough rock. A wide brimmed hat offers protection from the sun, especially above treeline. -
Footwear
Wear sturdy boots with a good tread, as scrambling often involves travel over loose rock (scree) where ankles need support. Be prepared for all conditions - waterproof your boots. When travel over snow is expected, bring gaiters. Ankle gaiters keep small rocks out of boots as well. A two sock system (thin inner sock, thick outer sock) wicks moisture away from, and cushions, your feet. -
Sunglasses and Sunscreen
Above treeline, glare from rock and snow surfaces, when added to direct sunlight, can quickly burn unprotected skin. -
Rock Helmet
A helmet is required on Scrambles of difficulty 7 or higher. Many members bring helmets on all scrambles, and wear them when rockfall is a possibility. -
Hiking Poles
Many people use poles for hiking, and scrambling as well. Poles help with balance while ascending and descending scree. Poles with three sections can be easily packed when on steeper terrain where you need your hands free. -
Ice Axe
On some scrambles travel on snow slopes is the preferable, and sometimes only, route to follow. An ice axe, when used properly, can prevent a slip, or stop a slide down a snow slope. Glissading down a snow slope can be a fun and fast way to descend. An ice axe can make glissading safe by offering a method to control the speed of descent. -
Headlamp
The time to complete a scramble varies with route conditions, weather, the skills and endurance of participants, and unforeseen delays. While it is not desirable to return after dark, it is often preferable to staying out overnight. It is advisable to bring a light, preferable a headlamp that frees your hands, to negotiate your way back. Once you experience travel in the dark without a light, you will carry one from then on! -
Personal First Aid Kit
Carry a small first aid kit for yourself, and others. You should expect a minor scrape or two, therefore have a supply of various sized Band-Aids. Blisters are another common injury, especially when wearing new boots, or on early season scrambles when your feet are not in shape. Include small scissors, moleskin, some Vaseline, 'second skin', and tape. (Take a first aid course to care for these minor, but common injuries) -
Extra Food and Water
Delays may keep you out longer than expected. This is generally when you are tired, and some extra food and water can revitalize you. Keep some non-perishable high energy food in your pack at all times. Natural water sources may not be available, so bring extra. -
Emergency Supplies
Everyone should bring an emergency shelter (two large orange garbage bags can keep you dry and out of the wind), a whistle and a light for signaling, toilet paper, fire starters, and water tablets. These items are lightweight, inexpensive, and take up very little space in your pack. They can make an unplanned overnight more comfortable, and could save your life.
Safe Scrambling Practices
-
Scrambling can be DANGEROUS and you could be KILLED
Scramble routes are usually prone to rockfall. Climbing is commonly done without the use of ropes or other protective climbing equipment. It is always possible to mistakenly go off route and venture onto more serious terrain. Start off on easy scrambles to develop your skills and knowledge. Observe and learn from others. Indoor climbing walls offer a safe environment to learn basic climbing techniques. Scrambling can be fun and rewarding, but there are serious risks involved. Be aware of this at all times; do not become complacent. -
Wear Your Helmet
It is good practice to bring a helmet on all scrambles, not just those of difficulty 7. Wear your helmet if there is any possibility of rockfall from above, either from people or from natural causes (wind, erosion, water melt, animals). Even on tame looking scree slopes helmets can protect your head if you should fall. Consider also how all that loose rock got there in the first place (it fell or rolled there). Certainly wear a helmet when near rock bands and cliffs. A small pebble blown off the cliff by wind can kill you. -
Scree Slopes
People tend to dislodge rocks while descending scree slopes. Try not to be directly below anyone else, and avoid being directly above others. Stop often to check where everyone is on the slope. Stay within sight and hearing distance of other participants. Regroup if the slope is a long one. Often there is one "great" section of loose pebbles to descend, and everyone wants to use it. Either go one at a time, or go side by side, or stay very close together if it is narrow. Staying close avoids displaced rocks from gaining too much speed if they should hit the person in front. The same principles apply to ascending scree slopes if they are steep. Many people find hiking poles help with balance while negotiating these slopes. -
Gullies
Gullies are natural highways for falling rock. Avoid them if you can, but often they are the only feasible way through rock bands. Move steadily through them, do not stop if possible. Move together closely as a group to avoid dislodged rocks. If the gully is steep and narrow, move one or two at a time. Plan to move through gullies with ice and snow early in the day when embedded rocks are still solidly in place. Moving through gullies with running water is dangerous due to water induced rockfall. -
Rock Bands
Avoid climbing rock bands if you can. Generally there is an easier way if you look. If you feel you must climb up a rock band make sure you can climb back down it. Do not attempt to climb a rock band unless you are sure you can retreat if you have to. -
Cliffs
If you are traversing below a cliff it is generally best to stay as close to the base as possible. Falling rocks tend to bounce out and land on slopes away from the cliff base. Wear your helmet. -
Cornices
Cornices are snow accumulations that grow at the top of cliffs or steep slopes. They can break off without warning, and are especially dangerous in the spring and early summer. Avoid travel beneath them, or stay well away from the base of the cliff or slope. When traversing ridges with cornices stay well back from the edge, on solid rock if possible. Warn others who may be forgetful of this danger! -
Moving on Loose Rock
Be careful how you move; use finesse. Take pride in not dislodging rocks; make a game of it. Develop an eye for where to place your feet safely. Always consider the consequences of what rocks you dislodge could have on others below. -
Lichen Covered Rocks
Lichen covered rocks, when wet, are extremely slippery. Avoid them if at all possible. -
Boulders
Large boulders on steep slopes can be unstable. The consequences of a boulder rolling on you are obviously serious. Avoid them on steep slopes, or on low angle slopes if they seem unstable. Often lichen and other vegetation indicates a stable boulder slope. -
Moraines
Glacial moraines are a type of unstable slope to avoid. They are often steep sided, subject to rapid erosion, and prone to rockfall. Travel along the crest of moraines however can be pleasant and relatively safe, especially if animals have worn a path there. -
Slabs
Ascending low angle slabs can be much faster than going up scree. You will generally need boots with tread that provide good grip (Vibram is one type). Move with your boots flat to the slab (smearing) to maximize the tread surface gripping the rock. Stand vertically over your feet to maximize the downward pressure on the boot tread. Beware of and avoid sections with loose pebbles. The same principles apply to descending slabs. Often it is easier to traverse down slabs to keep your boots smearing the rock. -
Yell "ROCK"
If you see a rock falling in the vicinity if others, yell "ROCK" loudly. If you hear someone else yell "ROCK", take cover. Instinctively you may turn around and look up, or cover your head with your hands. This may result in a rock in your face, or a broken hand. Instead try to hear where the rock is coming from, and move accordingly. If you are in a gully, try to move up one side. If you are near a cliff, move as close to the base as possible. -
Lightning
Scramble destinations are often mountain tops or high ridges. Be observant of changing weather conditions, and look for escape routes as you climb. Lightning is the main threat while above treeline. Descend quickly before a storm is within striking range. -
Snow Slopes
Summer snow that has gone through many freeze-thaw cycles is generally stable. Snow slopes can become unstable:- if they face the sun and heat up (mid-morning though late afternoon);
- if they did not freeze overnight;
- if it rains; or
- during and after a heavy snowfall.
- cornices above the slope: they can break off unpredictably; and
- cliffs, boulders, constricting gullies, streams, or lakes below the slope: they worsen the consequences should you or the slope slide.
Scrambling Tips
-
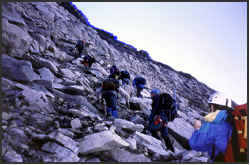
Ascending Scree
Travel on scree is almost unavoidable in the Rockies. Some scree slopes can be energy-sapping to ascend, while other scree slopes can offer a solid staircase-like route up a slope (well, almost). Avoid loose, pebble scree unless tread-milling is your style. Look for scree made of medium sized rocks that you can step on individually. Often these rocks will stay put while you ascend. Avoid large boulders that could roll on you. You can often tell the stability of scree slopes by their colour. Stable scree is often dark coloured due to the black or dark green lichens that grow on them. Unstable scree is often light tan or light grey coloured due to fresh rock surfaces (dolomite (tan) and limestone (grey) are common rock types in the Rockies). Foot placement can be important. If the scree is loose, treat it like snow, and tamp it down slightly with your foot to make a platform. Look for foot placements in small depressions where the scree may have settled somewhat. If you are not making much progress, stop and look around. Try different coloured or different sized scree. See how others are doing, and move onto routes where they are having more success. Sometimes rock ribs or slabs are present on scree slopes, and offer more solid footing. Note that loose rock and pebbles on outcrops can be treacherous. Often fine dirt in water runoffs provide solid footing. Anywhere you see vegetation there will usually be solid footing, but try not to damage the plants, especially on popular routes. As you gain experience you will develop an eye for the best ascent routes on scree, but be warned, some scree is just plain awful to go up. -
Descending Scree
Scree that is the worst to ascend, is often the best to descend. At its best, descents on loose pebble scree is fun and fast. You can make large jumping steps onto scree that gives way and moves with you. Look for light coloured pebble scree that fans out down the slope. Often you can see the lighter coloured tracks of others who went down before. Scree that is best to ascend is often the worst to descend. Each step down may be onto rocks that are relatively solid, or not. This where hiking poles offer balance and support. Lengthen the poles and plant them in front and to the side - you are now essentially walking on all fours. Expect to fall once in a while. Try to fall backwards and let your pack cushion the fall - but watch your head if not wearing a helmet. If you are having a difficult time, look around for other types of scree or rock to descend; observe how others are faring. -
Ascending Rock Bands
Climbing rock bands can be fun and rewarding. Before you start plan your route; visualize where you will go and what holds you will use. Be sure you can retreat back down if it gets too hard. Move one point (hand or foot) at a time while the other three are on holds. Check each hold or placement before committing to it. Thump it with the heel of your hand or kick it with your foot to help determine how solid it is. A good rule is to consider all holds and placements suspect, especially in the Rockies. Many holds and placements are quite secure with downward forces, but not with outward forces. Therefore use holds with downward pressure, and refrain from pulling out on holds. Climb with your legs and feet. Use your arms and hands for balance and stability only, otherwise you will soon tire. Once you have determined that a foot placement is solid, move onto it and position yourself directly over it. It is far better to be directly over one good foot hold than to be indirectly on two tentative holds. Stability is best attained when your posture is vertical, and your weight is directed straight down onto your footholds. Hugging the rock is instinctive with beginners, but places outward forces on footholds, making them less secure. As you climb look around for better routes that could not be seen clearly from below. However do not let a couple of good holds lead you to a dead end; keep the objective in mind. -
Descending Rock Bands
Most people find descending rock bands more difficult than ascending, but with practice it becomes easier and more natural. Just as with ascending, plan your route; move one point at a time; check each hand hold and foot placement; climb down with your legs, not arms; and keep your weight directly over your feet, do not hug the rock. Try facing out while down climbing, you will be able to see the route more clearly. If it is too steep for facing out, try sideways, or face the rock if that is more comfortable. It is often best to choose handholds at or below your waist to allow you to easily move down to lower footholds. An experienced participant should down-climb first to coach others as to best footholds, etc. Try to limit down-climbing to an absolute minimum, and then only to routes that you previously ascended and know. -
Ascending Snow Slopes
Snow slopes can offer one of the best ways to ascend. The person in front kicking steps for the group should:- keep the steps comfortably close together for all participants;
- make the steps deep enough to provide a secure footing; and
- angle the steps slightly downward into the slope.
-
Descending Snow Slopes
Snow slopes offer one of the fastest ways to descend a mountain. Snow also provides a soft forgiving surface that is very easy on tired feet. Two common methods of descend are kick stepping, and glissading.Kick steps with the heel of your boots using a determined, plunging style. This ensures a firm supportive foot plant. Have your ice axe ready if you should step on hard snow or ice. Generally it is best to make your own steps; using someone else's steps often does not provide firm support, or the steps may collapse.
Glissading, or boot skiing, is fun and fast. You need to have the ice axe skills to control your descent and to stop an uncontrolled slide. Practice on safe slopes.
Rock and general mountaineering courses are available locally - ask club members. Some good books are available, e.g. “Mountaineering: The Freedom of the Hills”.